|
The medicine ball is an
older product that has made its way back into favor recently.
With new technology the ball has become more versatile for use by
health professionals. Unfortunately, for those that are under a
tight budget, medicine balls can range in price from $20 to $60
depending on the size and quality of the ball.
The quality of the ball
that you want is going to depend on your intended use. Medicine
balls are excellent for improving dynamic flexibility. The
weight of the ball can help improve the functional range over which
force must be resisted and applied. Medicine balls are also a
great tool for learning to throw. Because of the weight of the ball,
there is a need to properly shift weight from the rear leg to the
front. This pattern is similar to swinging activities also.
Due to the impact on the ball, throwing exercises will require a more
durable ball then lifting exercises.
I did some research on the internet and found
3
methods of creating medicine balls that I decided to try out.
You'll need to have some patience since both the SandBall and
WaterBall
methods require a good 1/2 hour or so to fill up and the SLAMMER
SandBall is a good 2 1/2 hours. The steps for
creating them are listed below:
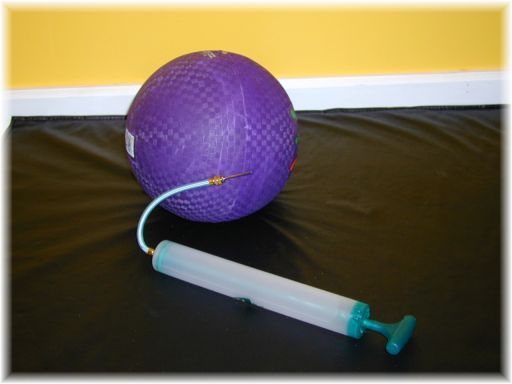
The "waterball"
method:
I found this method of making a medicine ball
inexpensive and satisfactory for non-throwing exercises.
Basically, you'll want to get a standard playground ball and a air
pump with a ball needle. I found both the ball and the pump at
Walmart for under $3.50 each. It is important to make sure that
the pump is able to be submerged in water.
Step 1: Put
the needle tip in the ball to let all the air out.
Step 2: Put the needle tip on the pump (while it's in the
ball)
Step 3: Submerge the pump in a wide sink or large bucket
so that you can pump water rather than air.
Step 4: Start pumping! It takes a while to squeeze
all that water through that little needle tip... but it does work.
(Although I didn't try it, I was told to mix a teaspoon of chlorine
bleach in with the water to prevent it from getting stale.)
Step 5: Although you probably thought you did a good job
of squeezing the air out of the ball first, you probably still have
quite a bit of air in it. Remove the needle tip from the pump
side and let some more air escape from the ball. Once the water
starts coming out, put the tip back on the pump and fill it up the
rest of the way.
That's it. The 8"
playground ball that I have pictured below ended up weighing 12 pounds
when I was done. It cost me about $3.45 for the ball and about
$3.50 for the pump. $7.00 is not bad compared to the $50 one
that I was looking at purchasing. We'll see how long it lasts
before the needle seal breaks.
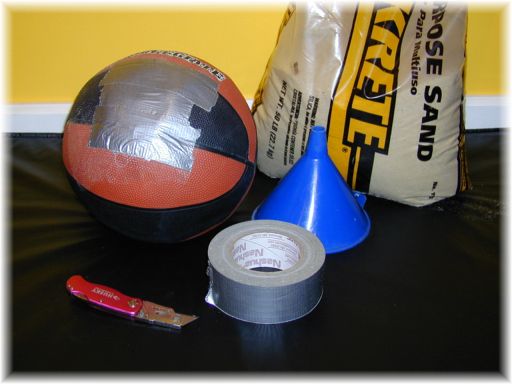
The "SandBall"
method:
This method requires a few
more tools, but the finished product feels a lot more authentic and
doesn't make your stomach gurgle from all the water sloshing around in
the previous method. You will need a basketball (good or bad
one, doesn't matter), a bag of sand, a funnel, a carpenters knife and
some duct tape. I saw shoe glue and rubber patches used on some
of the articles that I found, but have not tried that yet. I
have also seen some postings mention the use of cloth, lead shot,
pea gravel, foam, water, rice, and a combination of different contents.
Step 1: Cut a
small opening in the basketball using the carpenter's knife. I
found that making a "V" with cuts of about 1/2" to 3/4" will do the trick without creating a gaping hole that will need
to be patched.
Step 2: Put the funnel in the hole and pour the sand in.
At this point, depending on your choice of contents, you might be
stuffing in cloth or other weight items in the hole.
Step 3: Try to fill your ball completely to the top.
This apparently adds to the longevity of your ball. It is best
to bang the ball on the table or floor to help pack the sand down and
allow you to fill it further.
Step 4: Now you will want to fasten that hole flap back
in place. I used some crazy glue around the "V" and then some
nice strong duct tape over the top.
That's it. The
regulation size cheap basketball that I have pictured below ended up
weighing 25 pounds when I was done. It cost me about $4 for
the ball and about $2.00 for the sand. I like the size and feel
of this rubberized ball and have also made a 10, 15, and 20 pound
ball. A small rubberized basketball filled to the top will give
you the 10 pounder. The 15 and 20 pound balls take a little more
trial and error while you mess around with the different amounts of
cloth, rice, etc...
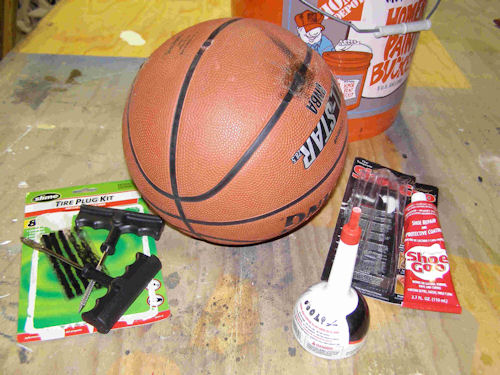
The "SLAMMER
Sand Ball"
method:
As far as a finished
product goes, I was VERY pleased with the SLAMMER SandBall method.
However, not everyone is too keen on putting 2.5 - 3 hours into making
a medicine ball! The great thing about this design is that it
lets you fill the ball with sand as with the above method, but then
you can add air to the ball again to retain the shape, rather than
putting in extra cloth and stuff for the lighter balls. The air
provides a nice consistency that allows the ball to retain some
bounce.
For this method I'd
recommend at least an "outdoor" basketball (~$7+) which is a little
more thick and sturdy than the cheap indoor basketballs (~$4).
I'd also recommend the finest sand that you can buy since you will be
pouring it through a much narrower funnel... I used paver patio
jointing sand (~$12 / 50 pound bag). You'll also need a radial
tire plug kit which can be used over and over again... some "Shoe Goo"
rubber cement... and last but not least, a very small funnel. I
cut the bottom off of a 3-in-1 plastic oil can as was recommended in
the plans.
The steps to complete this
design are simple enough, but VERY time consuming.
-
Using the tire plug
rasp/auger, punch two holes into the ball and move it back and forth
to make it as clean as possible. One of the holes will be used
to let the air escape, while the other will be used for the funnel and
sand.
-
Jam the funnel into one of
the holes
-
Start pouring in the sand.
If you're using a 50 lb. bag, I would recommend measuring out a
desired weight in a bucket so that you don't have to keep weighing the
ball as I did! I made the 15 pounder pictured below. Then
you can scoop the sand out of the bucket with a cup and pour it into
the funnel.
-
Weigh your ball to ensure
that you've achieved the desired weight (after unclogging your funnel
a number of times not doubt). Many bathroom scales might not
register some of the lighter weights. I used a basketball net
with one end tied shut (used for my
tornado ball plan) and then a hanging
fishing scale to measure the weight.
-
Follow the directions on
the tire plug kit which typically involve taking a patch, threading
the plug tool with it, coating it with rubber cement, and jamming it
into the hole. Patch both holes in this manner.
-
Cut off the excess plugs
from both holes. I also like to light them on fire to burn them
closer to the rubber and then smear them as flat as possible with a
putty knife.
-
Take the Shoe Goo and
cover the patch hole and a little more. I also smeared this
stuff so that it was flat. The Shoe Goo does a good job ensuring
that the patch is air tight and sealed.
-
Wait over night for the
glue to completely dry, and then put your desired amount of air into
it.
-
Start Slamming!
YouTube Video
There are some great
exercises to be done with medicine balls (wood
chops, medicine ball squats, medicine ball lunges, etc..)
and I will be adding some to my site in the near future. So if
the cost of the ball is your reason for hesitation, try one of these
inexpensive techniques and put them to good use!
|